Saturday, March 19, 2011
Friday, March 18, 2011
How to add feedburner email subscription to your blog
Never knew how to add an email subscription on blog till I found this. Blogger's tutorial wasn't that good but this one totally was below. EnJOY!
You might have seen lots of blogs are using email subscription option to their readers. It can happen that your friend using feedburner email subscription widget to his/her blog, and you are looking for a help to add email subscription option to your blog.

I'm guiding you about adding an email subscription widget to your blog from feed burner. These are easy steps to follow.
1) First of all and before anything, you'll need a FeedBurner account. To create an account, just click here. If you have already google account, that case it will be easier for you. Otherwise you can use other email address to open an account from FeedBurner.
2) If you are a new FeedBurner user, you'll need to burn your feed first.

3) Now you have burned a feed for your blog. Usually you'll not require to follow this step. It will automatically take you to step 4. But still if not, that case just click on your feed title, it will look like as below image.

4) Now click on the publicize link from your feed burner dashboard.

5) From the left side of the page, you'll find a link "Email Subscriptions", click on that.

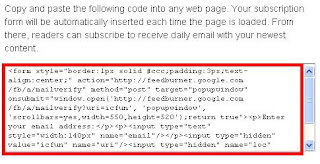
6) Now you'll see a piece of code like below. Just copy the code, and place at your blog. You can even select your blog type like (Typepad, wordpress, blogger) and it will automatically take to widget option for corresponding blogs system.

You have the email subscription widget to your blog now. From your feed burner dashboard, you can change the email preference, email from address, and many more option, which is located just under the "Email Subscriptions" link.

I'm guiding you about adding an email subscription widget to your blog from feed burner. These are easy steps to follow.
1) First of all and before anything, you'll need a FeedBurner account. To create an account, just click here. If you have already google account, that case it will be easier for you. Otherwise you can use other email address to open an account from FeedBurner.
2) If you are a new FeedBurner user, you'll need to burn your feed first.

3) Now you have burned a feed for your blog. Usually you'll not require to follow this step. It will automatically take you to step 4. But still if not, that case just click on your feed title, it will look like as below image.

4) Now click on the publicize link from your feed burner dashboard.

5) From the left side of the page, you'll find a link "Email Subscriptions", click on that.

6) Now you'll see a piece of code like below. Just copy the code, and place at your blog. You can even select your blog type like (Typepad, wordpress, blogger) and it will automatically take to widget option for corresponding blogs system.

You have the email subscription widget to your blog now. From your feed burner dashboard, you can change the email preference, email from address, and many more option, which is located just under the "Email Subscriptions" link.
Tuesday, March 15, 2011
Garbage Pail Kids Brent Engstrom Awesome Artist
This guy is AWESOME! One of the veteran Garbage Pail Kids artists!
Can You See the Difference Between 150dpi and 300dpi?
BLURRY FURRY
BLURRY NURRDY
I as a graphic designer have always been struggling with printers telling me that 150dpi is okay. While I do want to save space but I don't want quality to suffer. I notice 150dpi it suffers A LOT!
Well I thought this conversation was on point. I totally agree. I'm working on a huge movie poster 27 x 40" and it's a huge file but I think 200dpi should do as Mike answers well.
QuestionHi Mike,
I have a question about resolution of digital photos. Is it realistically possible, to the untrained eye to tell the difference between 150 and 300 dpi?
If I get some files that are 150dpi, how big can I develop the photos so that they still look reasonable?
Whats the difference with 300dpi?
I hope this makes sense.
Many thanks
tim
--------------------------------------
AnswerHiya Tim,
It's a fair question, and one that I have debated before.
You will tend to notice the lesser resolution (150dpi) compared against a higher resolution (300 or 600dpi) as the size of the prints increase and the distance to viewing decreases.
Overall quality depends on the resolution of your camera being matched correctly with the final print resolution. For example, a 6 megapixel camera produces a 3000 x 2000 pixel image. If you set your printer to 300DPI, and you're only printing out an 5 x 7" print, the printer must interpolate (adjust DOWN) the information because there's more information than can fit on the print.
5 inches * 300dpi = room for 1500 pixels on the page...
Viewing distance matters:
For example, if you take a typical billboard photo, they're printed at 50 ppi. But as you drive down the road, you really cant tell that. If you walk up close and personal to the billboard, you'd see it right away.
The closer you plan to look at the image, the higher the resolution is needed to produce quality results.
You can see the difference between 150 DPI and 300 DPI on an 8 x 10" print held at arm's length. Now, if that same image is printed to a smaller page, the differences won't be apparent until you bring the image closer.
200 DPI is considered a great wall-hanging picture resolution. It's more than enough for passer-by's and high enough that it'll stand close-up scruitiny for those who want a second look.
Merry Christmas Tim,
-Mike
Monday, March 14, 2011
Eco Homes from the Earth: 7 Ways to DIY
Oh my God this is what I want to do. Make a house made of recycled materials, grow a garden, etc. The only thing I'm concerned about is internet and electricity. I know, not very green right? It's just how I make my living is dependent upon technology too.
Hmm...any ideas?
ORIGINAL RESOURCE:
http://webecoist.com/2010/03/15/eco-homes-from-the-earth-7-ways-to-diy/
Wouldn’t it be nice to own your own green d ream home, made with recycled and natural materials and packed with custom features? Whether you’re an experienced builder or have never picked up a power tool in your life, you can build a natural eco-friendly h ome with user-friendly, low-cost materials like cob, cordwood, straw and the dirt and wood from your own land. These 7 natural building techniques produce beautiful h omes with a small ecological footprint and tons of p ersonality.
Earthships and Hobbit Houses
(images via dominicspics, ECOnscious, Earthship Biotecture)
They seem to be a living part of the very earth itself, often with nothing but a façade and some windows to betray the presence of a home in the hillside. And earth-sheltered homes built partially into the ground come with some incredible benefits, like the ability to absorb and regulate heat from the sun for comfort in all seasons. Earth-sheltered homes can be built entirely underground, bermed (covered with earth on one to three sides) or built into a larger hill with just one side open. Earthships and ‘hobbit houses’ are common forms of earth-sheltered homes.
Earthships are among the most popular types of DIY eco homes around the world, utilizing discarded “junk” like stacks of earth-packed tires, bottles and cans to build custom homes in practically any shape imaginable. While most beginners in this building technique stick to simple designs that are cheap and easier to build, some models are stunningly complex.
(images via: simondale.net)
Among the most famous examples of a ‘hobbit house’ is “A Low Impact Woodland Home”, self-built in Wales for about 1000-1500 man-hours (over four months) and £3000. Creator Simon Dale used stone and wood from the property, straw bales covered in plaster for the walls, and lots of reclaimed and salvaged materials like h ardwood flooring, doors and windows. The reciprocal roof, covered in plastic sheeting and mud/turf, is surprisingly easy to build and looks incredible.Cob
(images via: ziggy fresh)
How can a house made of mud last 500 years? The short answer is, the combination of clay, sand and straw – known as cob – is extremely strong and durable once it dries, and can withstand fire and severe weather as well as practically any other material. This ancient building technique is among the easiest and least expensive ways to b uild your own sustainable, healthy green home.
Just ask “Ziggy”, a resident of the Dancing Rabbit Ecovillage in Missouri who built his own cob cottage for just $3,000. Ziggy breaks down the costs, all materials used, time frame and the entire process including lots of photos at his w ebsite, “The Year of Mud”.
(images via: eco-sense)
These hand-sculpted homes give the builder practically endless creative opportunities for organic forms, built-ins like bookcases and benches, and even artistic details. But cob houses don’t all have to be free-flowing and eccentric. Take a gander at the Eco Sense house, located in Canada, which wouldn’t look out of place in a suburban neighborhood.Cordwood
(images via: daycreek, cordwood masonry)
From far away, it looks like stone masonry – but get up close and you’ll see that cordwood buildings are actually made from wood stacked firewood-style, and mortar. Debarked logs ranging from 12 to 36 inches can be arranged into walls either in load-bearing round structures or in combination with post-and-beam framing. Soft woods like cedar and pine are used because they are more stable, with less expansion and contraction. These walls offer both i nsulation and thermal mass. As with any natural building technique, it’s labor-intensive, but easy enough that practically anyone can do it.
(images via: home-n-stead)
While the mortar typically used for cordwood construction is made from Portland cement, lime and water, some people are beginning to combine cordwood building with cob in place of mortar, as in the owner-built cordwood home above.Straw Bale
(images via: building with awareness)
“I’ll huff and I’ll puff and I’ll blow your house down!” It seems like straw would be the worst possible material to depend upon for stable shelter, but in fact, straw bale building produces thick walls with excellent insulative qualities and surprising strength. As with cordwood and cob, straw bale walls can be load-bearing or can be combined with post and beam framework as needed to gain building permits.
(images via: solarhaven.org)
The straw bales are stacked on top of a masonry foundation, anchored to each other with wood stakes or bamboo poles, and finished with a breathable earthen or lime stucco that allows the walls to breathe, preventing moisture accumulation in the straw. Straw bale structures have been found to be remarkably fire- and pest-resistant.Rammed Earth
(images via: rogers rammed earth)
F ireproof, termite-proof, storm resistant, extremely low-maintenance and literally dirt-cheap: all of these qualities make rammed earth an attractive natural DIY option for owner-builders. Popular in hot, dry places like Australia and the American Southwest, rammed earth uses compressed dirt blocks as building bricks. The dirt is often from the home site, typically packed into a wood wall former, and the results are stunning and well suited for modern h ome designs.
(images via: rammed earth)
While tamping of the earth into bricks can be made easier by a pneumatically-powered tamper, it’s entirely possible – and much cheaper – to get the job done manually. Rammed earth buildings last indefinitely and results in energy-efficient buildings that keep temperature fluctuations to a minimum.Earthbag Building
(images via: dornob)
Imagine building with earth that you get for free from your own land, but without the intensive labor required to mix cob or compact bricks. Earthbag building has an extremely low learning curve and uses mostly waste materials. Woven polypropylene feedbags (often factory misprints) are filled with dampened soil and compacted from above with manual tampers. They’re held in place by two stands of barbed wire and can be filled in place, eliminating heavy lifting.
(images via: mother earth news, tiny house design)
Earthbags can be an ideal alternative to cob in areas where the soil has a low percentage of clay, and they also make it easy to construct domes and other rounded structures. Earthbag buildings can be bermed with earth to create an “underground” structure that looks like a seamless part of the landscape.
ORIGINAL RESOURCE:
http://webecoist.com/2010/03/15/eco-homes-from-the-earth-7-ways-to-diy/
Sunday, March 13, 2011
Amazine Rock Tree Houses & More!
Saw some wonderful pictures of houses and I wanted to share. Gosh I want to live at these places! I'll be following this site for sure!
http://thecatalyst.typepad.com/
----------------------------
A collection of the most amazing interiors/exteriors I've seen lately. Along with a bit of the interesting/magical/nonsensical..
Yes, I'd drink coffee here everyday.
http://thecatalyst.typepad.com/
----------------------------
A collection of the most amazing interiors/exteriors I've seen lately. Along with a bit of the interesting/magical/nonsensical..
A perfect dinner party treehouse dining room.
If that castle is still standing on that rock it is magic.
I love the siamese cat painting above the window.. cozy cozy.
Gorgeous, other-worldly.
Sweeeet pad, dude.
This room charms my socks off. That is one happy plant. Look at those beautiful big leaves.
Exotic Minimal Lovely
Yes, I'd drink coffee here everyday.
I heart greenhouse inspiration.
Do I like loud patterns/loud colors/cool fireplace/sweet windows? Yes.
Woodsy creative spaces are the best.
I am obsessed with treehouses if you didn't already notice..
Densely beautiful patterns are everywhere.
Futuristic color pods pop up.
Looks good enough for James Bond.
Fun with geometry.
Rustic natural minimalist perfection.
Carpet/drapery pattern-continuation always works for me.. so does bulbous furniture and pendant lamps.
Fancy Fun
Brilliant stairs.
Hi, I want to swing in you.
Original RESOURCE: http://thecatalyst.typepad.com/
All images via (either) : The Way We Live or Jules and Nicho
Subscribe to:
Comments (Atom)


